本文介绍Swift和自定义UITableView,具体方法流程和Objective-C一样。首先创建一个自己的UITableViewCell,然后在VIEWCONTROLLER中注册到tableview,注册数据源和代理。最后重写数据源的2个方法。下面开始动手。
首先创建UITableViewCell,XCODE中右键->New File->Cocoa Touch Class,然后subclass选UITableViewCell,勾选xib,这样好布局。当然你也可以代码实现。然后打开XNIB文件,在上面添加一个Label,然后在对应的UITableViewCell中拖出这个控件的定义。代码如下:
import UIKit
class MenuViewCell: UITableViewCell {


    @IBOutlet var label: UILabel!
    override func awakeFromNib() {
        super.awakeFromNib()
        // Initialization code
    }
    override func setSelected(selected: Bool, animated: Bool) {
        super.setSelected(selected, animated: animated)
        // Configure the view for the selected state
    }

}
OK,然后在ViewController中实现注册和数据源。下面代码:
import Foundation
import UIKit

class LeftMenuViewController: BaseViewController,UITableViewDataSource,UITableViewDelegate {

    //菜单识别串
    let identify = "MenuViewCell"
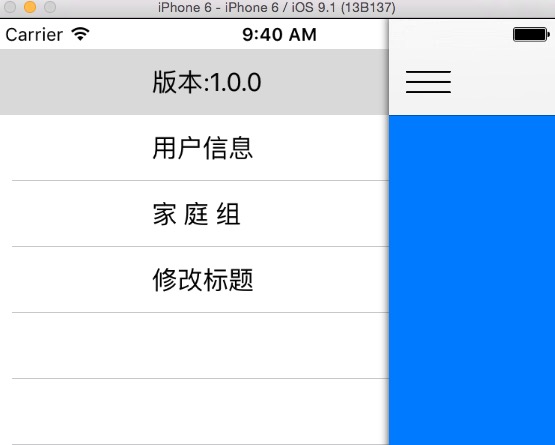
    var menuStrArray = ["版本:1.0.0","用户信息","家 庭 组","修改标题"]
    @IBOutlet var menuTabView: UITableView!

    override func viewDidLoad() {
        super.viewDidLoad()
        // Do any additional setup after loading the view, typically from a nib.
        menuTabView.dataSource = self
        menuTabView.delegate = self
        menuTabView.registerNib(UINib(nibName: identify, bundle: nil), forCellReuseIdentifier: identify)
    }

    override func didReceiveMemoryWarning() {
        super.didReceiveMemoryWarning()
        // Dispose of any resources that can be recreated.
    }

    func tableView(tableView: UITableView, numberOfRowsInSection section: Int) -> Int{
        return menuStrArray.count
    }

    func tableView(tableView: UITableView, cellForRowAtIndexPath indexPath: NSIndexPath) -> UITableViewCell{
        let cell:MenuViewCell = tableView.dequeueReusableCellWithIdentifier(identify, forIndexPath: indexPath) as! MenuViewCell
        cell.label.text = menuStrArray[indexPath.row]
        return cell
    }


}
最后上图:

本文链接:https://it72.com:4443/7940.htm