前言
React Native与传统的HybirdApp最大区别就是抛开WebView,使用JSC+原生组件的方式进行渲染,那么整个App启动/渲染流程又是怎样的呢?
React Native启动流程
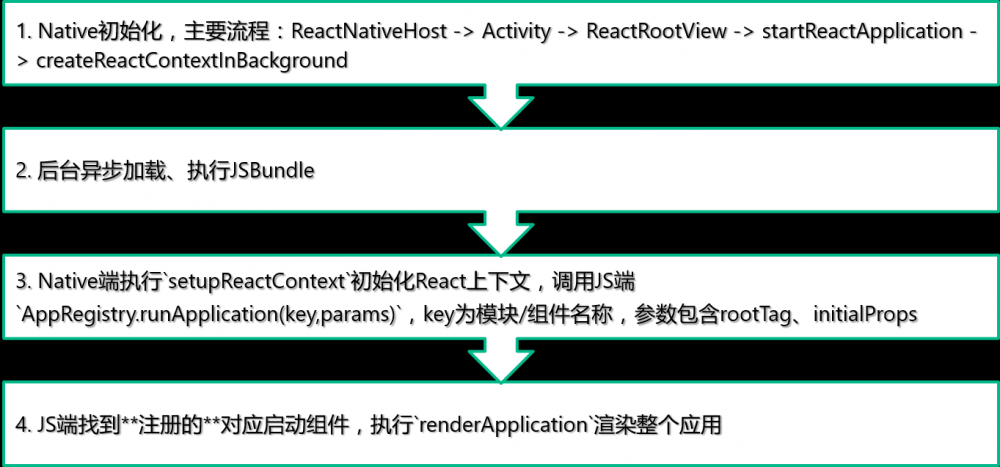
首先从组件的角度来看下RN的启动流程:(Android为例)
- Native初始化,主要流程:ReactNativeHost -> Activity -> ReactRootView -> startReactApplication -> createReactContextInBackground(期间有模块/UI组件信息收集、JSC初始化等工作)
- 后台异步加载、执行JSBundle
- Native端执行 setupReactContext 初始化React上下文,调用JS端 AppRegistry.runApplication(key,params) ,key为模块/组件名称,参数包含rootTag、initialProps
- JS端找到 注册的 对应启动组件,执行 renderApplication 渲染整个应用
renderApplication 函数中会执行:
ReactNative.render(
  <AppContainer>
    <RootComponent
      {...initialProps}
      rootTag={rootTag}
    />
  </AppContainer>,
  rootTag
);
其中 ReactNative 是在React库中定义的, AppContainer 是一个JS组件,使用View包裹了根组件,开发时工具 Inspector 、 YellowBox 都是在这个组件中加载, RootComponent 是传入的根组件。
JS端注册组件:(在第2步执行JSBundle时)
AppRegistry.registerComponent('TiebaNext', rootComponent);*仅在JS端处理,记录在一个Map中。
Android端定义启动组件,Activity中,继承ReactActivity:(在第1步时调用)
@Override
protected String getMainComponentName() {
  return "TiebaNext";
}
iOS端定义启动组件:
self.rctRootView = [[RCTRootView alloc] initWithBundleURL:jsCodeLocation
                                        moduleName:@"TiebaNext"
                                        initialProperties:nil
                                        launchOptions:nil];
简单说就是Native初始化 -> 加载JS,JS端注册组件 -> 端上调用JS端run方法 ,传入入口组件名称 -> JS端启动渲染流程。
React Native渲染流程
React的渲染都是以组件为单位,上面已经分析了,启动的最后阶段就是JS端开始渲染根组件。首先我们先看下React的组件是怎么编写的,以及他的生命周期:(熟悉React可略过)
一个例子,无网络提示组件:

(例子语言Typescript)
// 组件的属性定义
interface PropsDefine {
    // 组件宽度
    width: number
    // 组件高度
    height: number
    // 点击刷新按钮回调,可选
    onClickRefresh?: () => void
}
export class NoNetwork extends React.Component<PropsDefine, {}> { // 组件无状态,定义为空:{}
    // 组件的默认属性定义,单例,实例间共享
    static defaultProps = {
        onClickRefresh: () => { }
    }
    render() {
        let {width, height} = this.props
        return (
            <View style={[Styles.panel, {
                width: width,
                height: height,
            }]}>
                <View style={Styles.picBlock}>
                    <Image source={Styles.picUrl}/>
                </View>
                <View style={Styles.textBlock}>
                    <Text style={Styles.text}>你的网络好像不给力</Text>
                    <Text style={Styles.text}>点击按钮刷新</Text>
                </View>
                <TouchableOpacity style={Styles.button} onPress={this.props.onClickRefresh}>
                    <Text style={Styles.buttonText}>刷新</Text>
                </TouchableOpacity>
            </View>
        )
    }
}
跟端上组件开发一样,React组件也定义了组件的生命周期:
实例化
- getDefaultProps
组件类型首次 实例化时初始化默认props属性,多实例共享 - getInitialState
实例化时初始化默认state属性 - componentWillMount
在渲染之前触发一次 - render
渲染函数,返回DOM结构 - componentDidMount
在渲染之后触发一次
有需要重新渲染(props变更或者setState改变state时)
- componentWillReceiveProps
组件接收到新的props时调用,并将其作为参数nextProps使用,可在此更改组件state - shouldComponentUpdate
判断是否需要更新组件(在首次渲染期间或者调用了forceUpdate方法后,该方法不会被调用) - componentWillUpdate
更新渲染前调用 - render
渲染函数,返回DOM结构 - componentDidUpdate
更新渲染后调用
销毁
- componentWillUnmount
组件移除之前调用
那么这个组件到底是怎么用原生组件渲染的呢?首先我们先来看看最主要的render做了什么。jsx不太直观,我们先翻译一下render:
render() {
    let { width, height } = this.props;
    return (React.createElement(View, { style: [Styles.panel, {
                width: width,
                height: height,
            }] },
        React.createElement(View, { style: Styles.picBlock },
            React.createElement(Image, { source: Styles.picUrl })),
        React.createElement(View, { style: Styles.textBlock },
            React.createElement(Text, { style: Styles.text }, "/u4F60/u7684/u7F51/u7EDC/u597D/u50CF/u4E0D/u7ED9/u529B"),
            React.createElement(Text, { style: Styles.text }, "/u70B9/u51FB/u6309/u94AE/u5237/u65B0")),
        React.createElement(TouchableOpacity, { style: Styles.button, onPress: this.props.onClickRefresh },
            React.createElement(Text, { style: Styles.buttonText }, "/u5237/u65B0"))));
}
这下清晰多了吧?
React.createElement 的方法签名:
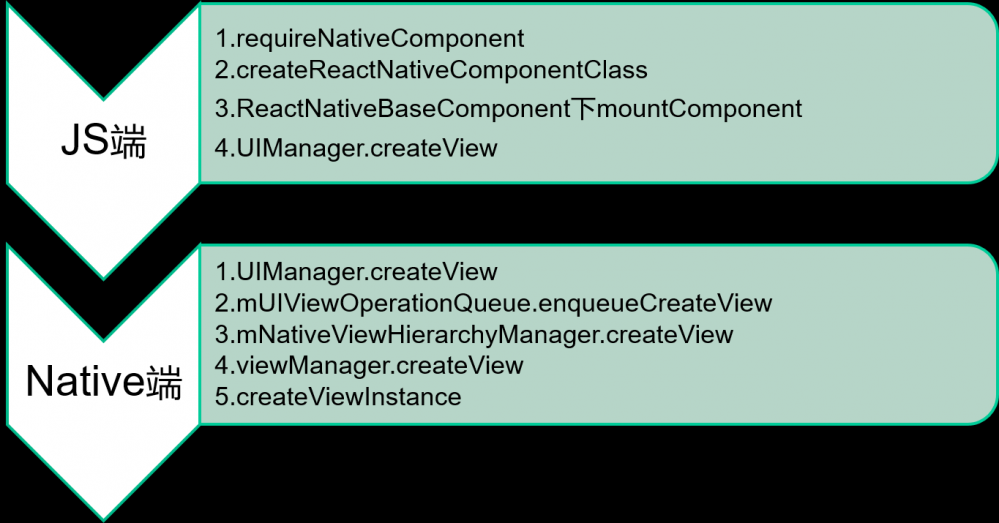
ReactElement.createElement = function (type, config, children){ ... }ReactNative的UI组件通过 requireNativeComponent -> createReactNativeComponentClass -> ReactNativeBaseComponent下mountComponent 的调用关系,最终在 mountComponent 中调用 UIManager 组件创建View: UIManager.createView(tag, this.viewConfig.uiViewClassName, nativeTopRootTag, updatePayload); ,在Native端,UIManager调用对应组件类型的ViewManager(单例,管理类)创建实例。
* UIManager 是一个NativeModule,待下面分析
接下来我们来详细分析下原生组件的实现方法,以Image组件为例:
iOS和Android实现有一定差异,首先是Image组件JS端代码,都需要 requireNativeComponent 加载原生组件:
const RCTImageView = requireNativeComponent('RCTImageView', Image);Image的JS端实际上也是一个React JS组件,他也有render,返回的是:(iOS)
<RCTImageView
  {...this.props}
  style={style}
  resizeMode={resizeMode}
  tintColor={tintColor}
  source={sources}
/>
因为业务逻辑是写在JS端的,创建出了Native组件就需要进行控制,自然就涉及到属性传递、方法调用、事件回调这3个需求。
Native组件跟JS端通讯方式
JS端组件跟Native真正实现的组件主要涉及三件事:
- 属性同步
- JS端调用Native方法
- Native事件回调JS端
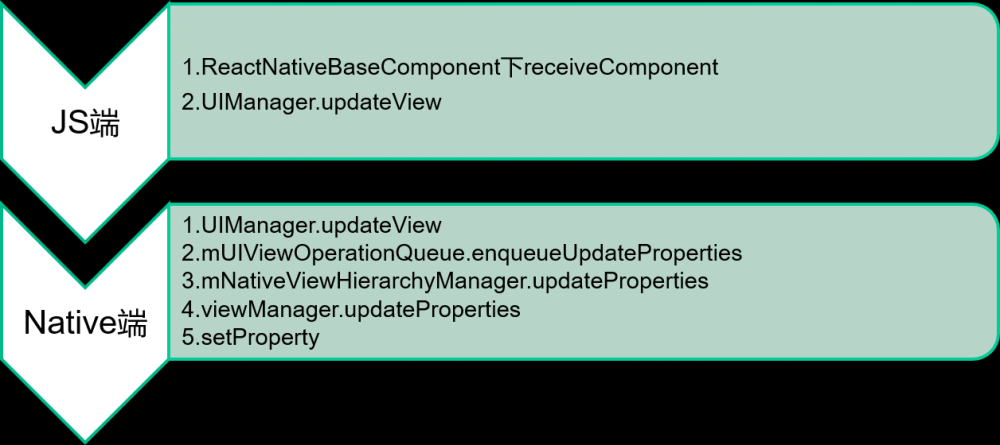
属性同步
属性同步很简单,实际上是在组件重新render的时候调用 ReactNativeBaseComponent 下 receiveComponent -> UIManager.updateView 完成的。
JS端调用Native方法
两种方法,一种是调用 NativeModules (后面有简单分析),如果想直接调用一个具体View的方法,那就需要使用UIManager模块:
Android端UIManager中的定义:
@ReactMethod
  public void dispatchViewManagerCommand(int reactTag, int commandId, ReadableArray commandArgs) {
    mUIImplementation.dispatchViewManagerCommand(reactTag, commandId, commandArgs);
  }
iOS端UIManager中的定义:
RCT_EXPORT_METHOD(dispatchViewManagerCommand:(nonnull NSNumber *)reactTag
                  commandID:(NSInteger)commandID
                  commandArgs:(NSArray<id> *)commandArgs)
{
  RCTShadowView *shadowView = _shadowViewRegistry[reactTag];
  RCTComponentData *componentData = _componentDataByName[shadowView.viewName];
  Class managerClass = componentData.managerClass;
  RCTModuleData *moduleData = [_bridge moduleDataForName:RCTBridgeModuleNameForClass(managerClass)];
  id<RCTBridgeMethod> method = moduleData.methods[commandID];
  NSArray *args = [@[reactTag] arrayByAddingObjectsFromArray:commandArgs];
  [method invokeWithBridge:_bridge module:componentData.manager arguments:args];
}
这个方法是从端上映射到JS的,所以在JS端可以这样调用:
UIManager.dispatchViewManagerCommand(
    findNodeHandle(this), // 找到与NativeUI组件对应的JS组件实例
    UIManager.[UI组件名].Commands.[方法],
    [] // 参数
)
findNodeHandle 方法是在React中定义,可以找到组件实例的 reactTag (执行在JS端),UIManager可以把调用命令分发到Native端对应的组件类型的ViewManager,再通过ViewManager调用View组件实例的对应方法。
Native事件回调JS端
Android端使用的是类似JS端调用Native的方式,使用了事件机制,不过事件的接收者是从JS端映射过来的,React下 ReactNativeEventEmitter.receiveEvent(tag, topLevelType, nativeEventParam) ,所以需要先实现一个Event:(Switch的onValueChange事件)
class ReactSwitchEvent extends Event<ReactSwitchEvent> {
    public static final String EVENT_NAME = "topChange"; // topChange会被映射成onChange,具体映射关系参见 UIManagerModuleConstants.java
    public ReactSwitchEvent(int viewId, boolean isChecked) {
        super(viewId);
        mIsChecked = isChecked;
    }
    public boolean getIsChecked() {
        return mIsChecked;
    }
    @Override
    public String getEventName() {
        return EVENT_NAME;
    }
    @Override
    public short getCoalescingKey() {
        // All switch events for a given view can be coalesced.
        return 0;
    }
    @Override
    public void dispatch(RCTEventEmitter rctEventEmitter) {
        rctEventEmitter.receiveEvent(getViewTag(), getEventName(), serializeEventData());
    }
    private WritableMap serializeEventData() {
        WritableMap eventData = Arguments.createMap();
        eventData.putInt("target", getViewTag());
        eventData.putBoolean("value", getIsChecked());
        return eventData;
    }
}
然后在ViewManager或View中进行事件派发:
ReactContext reactContext = (ReactContext) buttonView.getContext();
reactContext.getNativeModule(UIManagerModule.class).getEventDispatcher().dispatchEvent(
    new ReactSwitchEvent(
        buttonView.getId(),
        isChecked));
iOS端实现有所区别,iOS端将JS函数直接映射到Native,所以可以直接调用(可多次调用):(View为RCTSwitch)
// ViewManager中声明事件为RCTBubblingEventBlock或RCTDirectEventBlock
RCT_EXPORT_VIEW_PROPERTY(onChange, RCTBubblingEventBlock);
// View中声明
@property (nonatomic, copy) RCTBubblingEventBlock onChange;
// view实例化时监听onChange
- (void)onChange:(RCTSwitch *)sender
{
  if (sender.wasOn != sender.on) {
    if (sender.onChange) {
      sender.onChange(@{ @"value": @(sender.on) });
    }
    sender.wasOn = sender.on;
  }
}
这样就可以从JS端创建NativeUI组件了,可以看到UI组件的Native和JS端是通过reactTag进行的关联,通过UIManager模块,在Native端的DOM和React的DOM进行同步操作,保持结构一致。
UIManager
模块数据结构,JS端可访问:
UIManager.[UI组件名].[Constants(静态值)/Commands(命令/方法)]
从端上映射的方法:(部分)
- createView(int tag, String className, int rootViewTag, ReadableMap props)
创建View - updateView(int tag, String className, ReadableMap props)
更新View - manageChildren(int viewTag, Array moveFrom, Array moveTo, Array addChildTags, Array addAtIndices, Array removeFrom)
批量添加/删除/移动一个view下面的view - measure(int reactTag, Callback callback)
测量View的位置、size等,结果异步回调 - measureInWindow(int reactTag, Callback callback)
测量View相对屏幕的位置、size等,结果异步回调 - dispatchViewManagerCommand(int reactTag, int commandId, ReadableArray commandArgs)
派发View命令,也就是用来调用对应View的方法
这个模块是NativeModule方式定义的,在RN的JS端启动时,端上会通过JSC把收集到的模块信息(名称)打到JS端全局变量 global.__fbBatchedBridgeConfig 中,并采用延迟加载策略:设置 NativeModules.[模块名] 的getter,延迟通过JSC读取模块详细信息(方法、命令号等信息)。在调用的时候会放到 MessageQueue 的队列里,批量提交,两次批量提交限制的最小间隔为5ms。
来自:http://www.cnblogs.com/zhang740/p/5978323.html
- 文章2322
- 用户1338
- 访客12415073
这个世界总有更多春天可期。